
How to Clean Your Cat’s Ears
Every cat owner knows how meticulous these creatures are when it comes to self-grooming. It is quite common to see your cat licking its body, making sure that it’s squeaky clean all day long.
However, there are certain spots that cats can’t always clean by themselves, and they will need a helping hand, and this is where you will have to step in. Learning how to clean your cat’s ears will help you detect any potential problems and will also keep your kitty happy and content.
Cat Attitudes is reader-supported. When you buy through links on our site, we may earn an affiliate commission.
It’s not a challenging job as long as you’re patient and can give your cat some time to feel comfortable. Keep on reading to learn more about cleaning your cat’s ears.
- Sit in a comfortable position
- Wrap your cat in a towel
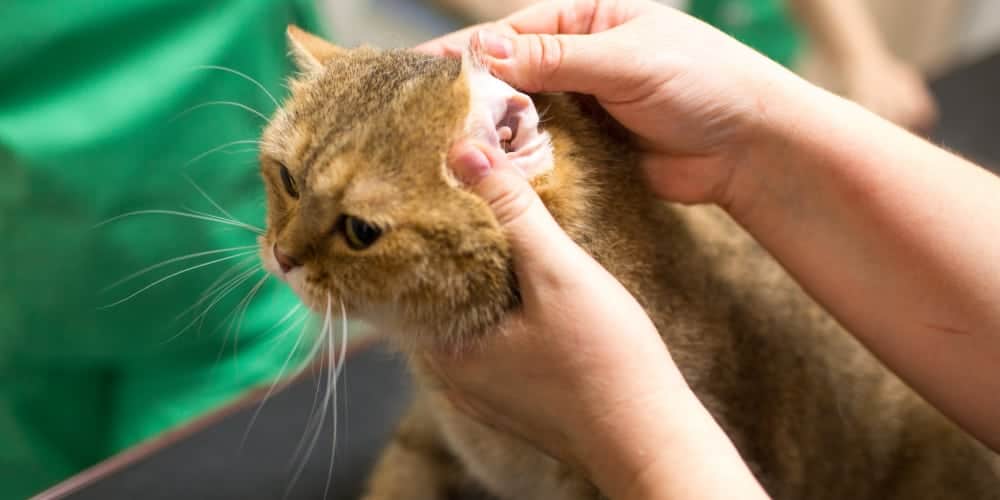
- Hold your cat’s head gently and examine his ears for injuries
- Hold the tip of the eat and expose the ear canal
- Wipe the outside of the ear
- Get a gentle but potent ear solution
- Avoid using Q-tips
- Squeeze an appropriate amount of cleaner into the ear canal
- Massage below the ear opening gently for 30 – 60 seconds
- Use a clean cotton ball to wipe the ear area and canal
How Often Should You Clean Your Cat’s Ears?
Cats pay lots of attention to every part of their bodies, cleaning and grooming themselves all day long. But because ears are hard to reach, they will need your help to make sure they’re clean and free of debris.
Cleaning your cat’s ears will help detect any potential ear infections or parasites that might infest your beloved pet. Cats also feel happier and more relaxed when they’re well-groomed because excessive wax can cause itchiness or overall discomfort. Although cats don’t take baths as much as dogs do, cleaning and inspecting the ears should be part of your usual care routine.
Due to the structure of the ears, any trapped debris, wax, or foreign objects can’t be expelled without external help. These materials can lead to itchiness, discomfort, and other serious symptoms if not removed, and the ears are adequately cleaned.
There’s no rule regarding how often you should be cleaning your cat’s ears. For example, if you have a house cat that rarely gets off the couch, you can inspect the ears every few weeks, and you might not have to clean them as often. However, if you have a kitty that goes outdoors and likes to interact with other pets in the house or spends more time in the backyard, you will have to clean their ears more often to make sure that nothing is clogging the ears.
You should start inspecting your cat’s ears starting from the time it’s a small kitten. This way, it will get used to having its ears checked and handled, and it won’t struggle when it’s time to have the ears cleaned.
Overcleaning the ears can cause a lot of issues. It can irritate the ear canal, cause infections, or harm the ear canal. You should only clean your cat’s ears if they need to be cleaned or if they look dirty.
What to Watch For When You’re Cleaning Your Cat’s Ears
Cleaning your cat’s ears is an excellent opportunity to detect any early signs of diseases or infections that might affect the pet’s health in the long run. Here are some things that you should take into consideration.
- Bad smell can be a sign of a severe skin infection.
- Patches of bald, scaly, or injured skin can be caused by parasites.
- Excessive scratching of the ears or shaking of the heads, especially if you try to touch the cat’s ears. This can be a sign of severe pain due to an internal infection or wound.
- Dark-colored skin or debris inside or around the ears can be a sign of a serious skin infection.
- Excessive wax or discharge inside the ear can be related to an internal inflammation that needs to be treated by the vet.
- The ear looks red or inflamed because of a bacterial or fungal infection.
If you can see any of these symptoms before or during cleaning your cat’s ears, you should take it to the vet as soon as possible to have the ears adequately examined and cleaned.
What Do You Need to Clean Your Cat’s Ears?
You don’t need a lot of tools to clean your cat’s ear canal. Here is what you need.
- Cotton balls.
- An appropriate cleaning solution.
- A towel or blanket to keep the cat comfortable and warm if necessary.
How to Clean Your Cat’s Ears
It’s best to start cleaning the ears when the cat is already relaxed. Most cats aren’t that fond of having their ears touched and inspected, so the cleaning process might not be that easy if your kitty is already stressed out or anxious. You can start the cleaning process while your cat is snoozing or after you have finished grooming it. Here is what you have to do.
- Sit in a comfortable position that allows you to hold the cat for an extended period.
- Wrap your cat in a towel if this can make it feel more comfortable and warm.
- Hold the cat’s head gently and examine the outside part and the folds of the ears for any injuries. In some cases, calming the cat down can be a little challenging. In this case, you might ask someone else for help to make sure that you can keep the cat’s head steady.
- Hold the tip of the ear and pull it back slightly to expose the air canal.
- Wipe the outside of the ear while paying attention to any skin folds around the ear opening.
- Get a gentle yet potent ear cleaning solution. Some cleaning solutions can be too harsh because they contain alcohol or hydrogen peroxide. They might dry out the ear canal and cause further irritation. If your cat suffers from bacterial or fungal infections, you can ask the vet to recommend a suitable cleaner.
- Avoid using Q-tips that can harm the eardrum or push the debris and wax further through the ear canal, where they will be more difficult to remove. You should also avoid using any objects or cleaning solutions that are intended for humans.
- Squeeze an appropriate amount of the cleaner into the ear canal. Make sure that the tip of the bottle doesn’t touch the ears to prevent the spread of bacterial or fungal infections. After applying the cleaner, wipe the end of the bottle with a cotton ball that has been soaked in alcohol.
- While holding the ear flap, put your fingers under the ear opening. Massage below the ear opening gently for 30 seconds to one minute. This will allow the solution to break and dissolve the debris and wax particles so they can be easily removed.
- Use a clean cotton ball to wipe the outer part of the ear canal and any dissolved debris. By then, your cat will be eager to move its head to get rid of the remaining solution. Allow the cat to shake its head to get rid of any clogged wax or remaining cleaning solution.
- Keep on wiping the outer part of the ear using clean cotton balls. The oozing cleaning solution will carry more particles of the trapped wax or debris.
- You can try to wipe the inside of the ear canal, only as far as your finger can go without pushing too far away. Avoid using any hard objects to dry the ear from the inside and repeat the process with the other ear.
- It’s quite common for your cat to feel a little irritated after the ear-cleaning session. Pet the cat’s head and make sure that it’s comfortable. Provide it with some treats and hold it until it’s no longer uncomfortable. This will help your cat associate cleaning the ears with a positive experience.
If you notice that your cat is in pain while cleaning the ears, or if you notice anything unusual, you should take it to the vet. You might have to repeat the cleaning process again if the cat has excessive wax buildup.
You will be able to apply any medicine to the ears if your cat suffers from a medical condition. This will guarantee that it has reached every part of the ear canal to treat the infection. You should administer the medicine in the same way, making sure that the bottle tip won’t get in touch with the ear itself.
In some cases, cleaning your cat’s ears becomes exceptionally challenging, so you shouldn’t try to push it. This will only make the cat more stressed and more resistant. In this case, you should take the cat to the vet.
Final Thoughts
Cats are experts when it comes to self-grooming, but in some cases, they need some help. You don’t need a lot of tools to clean your cat’s ears. However, you need some patience and practice because cats might not be comfortable about having their ears touched.
All you need is to hold the outer ear flap and pour a suitable cleaning solution inside the ear canal. Don’t try to push anything inside the ear as it might damage the ear canal or push the wax and debris further inside.